Worm Composting

Let worms do the work!
Want to reduce your garbage but don't have room for a backyard composter? Looking for an educational and fun project for the kids? Then put worms to work for you.
What is worm composting?
Worm composting or vermicomposting is natural way to recycle food waste by using redworms to convert food scraps into compost. It can be done year round, indoors and outdoors by apartment dwellers and other householders. The worm castings produced provide a nutrient rich organic fertilizer and soil conditioner for houseplants, gardens and lawns.
Sustaining the land, saving the landfill
About 500 gm or one pound of redworms can convert 3.6 kg of food waste per week into soil enriching compost. Over the course of a year that means sending 187 kgs less waste to the landfill and helping to reach the region's goal of diverting 75% of its waste from the landfill by 2010.
Four easy steps to getting starting...
- A fairly shallow and wide container (made of wood or plastic)
- Bedding (shredded newspaper will do)
- Worms (750 - 2000 redworms)
- Food waste (uncooked fruit and vegetable waste)
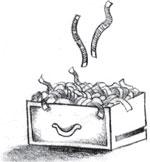
- The bin should be 20 to 30 centimetres (cm) deep.
- Provide 30 square cm of surface area for each 500 gm of food waste added per week.
Give your worms air to breathe:
- Drill eight to 12 holes about five cm apart in the bottom of the container. If contents get too wet, drill more holes.
- Place a tray under the container to capture excess liquid for use as a plant fertilizer.
- Raise the bin on bricks or wooden blocks.
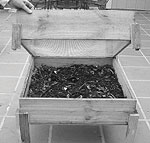
www.ecoyardfarming.com
Cover the bin to conserve moisture and provide darkness for the worms. Indoors, place a sheet of dark plastic or burlap sacking on top of the bedding, or cover with an aerated lid. Outdoors, use a solid lid to keep out unwanted scavengers and rain.
Worm bins can be kept in the basement, shed, garage, on the balcony or under a kitchen counter. They must be kept out of hot sun, heavy rain and cold. When temperatures drop below 4ºC, bins should be moved indoors or be well-insulated.
Suitable bedding materials include shredded newspaper and cardboard, dry leaves, chopped-up straw, seaweed, dried grass clippings, peat moss, compost and aged manure.
- Vary bedding in the bin to provide more nutrients for the worms and to create a richer compost.
- Add two handfuls of sand or soil to provide grit the worms need to digest the food waste.
- Fill the bin with a mixture of damp bedding so that the overall moisture level is like a "wrung-out sponge."
- Lift the bedding gently to create air spaces. This helps control odours and gives the worms freer movement.
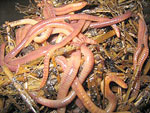
- Ordering from websites such as www.compostworms.ca
- Collecting them from a friend's worm compost bin, or aged manure pile at horse stables or farms
| YES | NO (To avoid pests and odors) |
|
|
|
|
 |
After adding worms to your bin feed them by:
- Pulling aside some of the bedding, putting in food scraps and recovering with bedding material.
- Burying successive loads in different locations in the bin.
Harvesting your compost

Quick Method
The quickest method is to shift the finished compost to one side of the bin, put new bedding in the space created, and place food waste in the new bedding. The worms will gradually move over and the finished compost can be skimmed off as needed.
Some Fuss
If you have the time or want to use all of the compost at once, dump the entire contents onto a large plastic sheet and separate the worms manually.
Most children love to help!
Watch for the tiny lemon-shaped worm cocoons that contain up to 20 baby worms. Separate and store the finished compost in plastic bags. Return the worms and cocoons to the bin, and mix some finished compost with the new bedding.
Using your finished compost
Your garden and houseplants will benefit from the humus produced by worm composting. Applying it will improve the texture of clay and sandy soils and restore essential nutrients. Your flowers, plant and vegetables will thrive!
Common problems and solutions
Unpleasant Odours
Overloading your bin with food waste may result in unpleasant odours. Here are some solutions:
- Gently stir the bin contents to allow more air in.
- Stop adding food until worms and microorganisms have broken down the food in the bin.
- Check the drainage holes to ensure they're not blocked and drill more holes if needed.
- If the moisture level seems right, the bedding may be too acidic from too many citrus peels and other acidic foods. Adjust by adding a little lime and reducing acidic wastes.
- Collect your food waste in a covered container.
Helpful resources
- Worm Suppliers - Click Here to locate suppliers of worms for your compost.
- YouTube - Visit www.youtube.com to view several fun and informative video clips on worm composting projects.
- Worms Eat My Garbage - "Worms Eat My Garbage" by Mary Applehof provided background on worm composting. Visit www.wormwoman.com for information on worm composting or to order books on the subject.
